How to Use S3 for Storing Great Expectation Results
Introduction Great Expectations(GE) allows us to oversee data pipelines and helps us to create data quality checks. In our previous post on running GE on EMR, we explored how to set up GE for your data pipeline and validate your data sources. Recentl...


Introduction
Great Expectations(GE) allows us to oversee data pipelines and helps us to create data quality checks. In our previous post on running GE on EMR, we explored how to set up GE for your data pipeline and validate your data sources. Recently, GE offered us a new feature to store validation results in AWS S3.
By default, validation results are stored in the uncommitted/validations/ subdirectory of your great_expectations/ folder. This may not be the best approach as validation results can contain sensitive data, and you may want to store them in a more secure location. This post will show you how to achieve this requirement by providing the GE way of storing them and our alternative for getting the same result. The only difference is that our process is more configurable and Easier To Change (ETC).
How to configure an expectation store with S3?
This section will briefly touch on how to store your validation results in S3 according to the official GE documentation. There are a few prerequisites to setting this up, and they are as follows:
- Having a working installation of GE (please refer to our previous post in case you don’t).
- Configured Data Context.
- Configured Expectation Suite and Checkpoint (also covered in our previous post).
- Installed boto3 (AWS SDK for Python) for your local environment.
- And last but not least, created an S3 bucket (that will store your validation results).
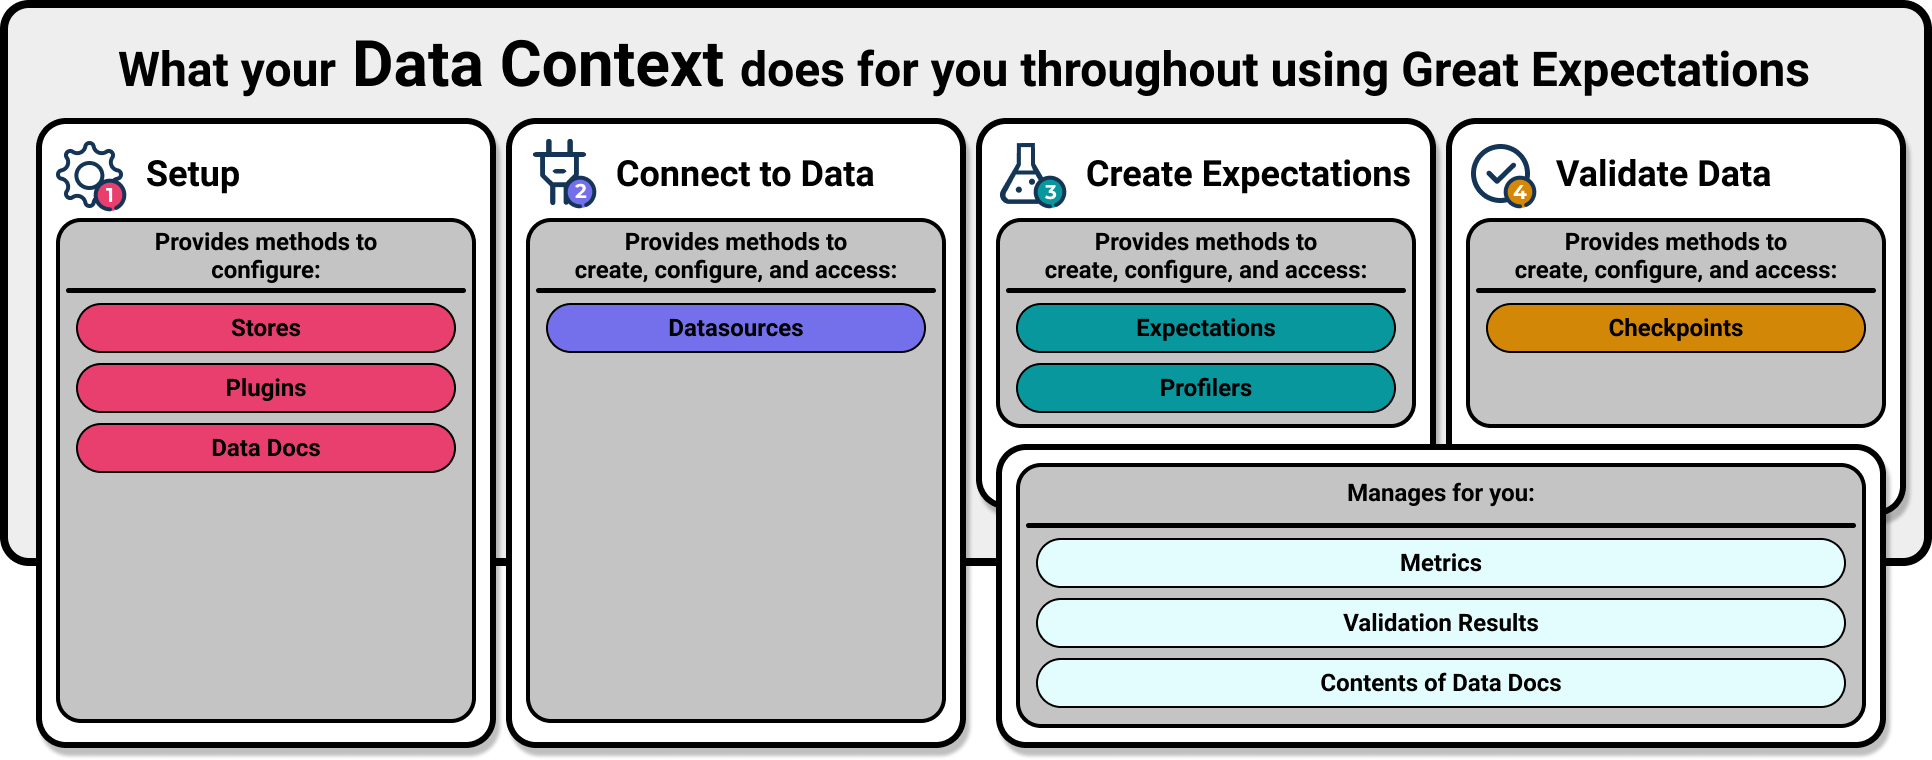
While the official GE documentation covers most of the setup for this adequately, we would like to point out that the key step here is creating the Data Context. The Data Context manages your project configurations and is the primary entry point for your GE deployment. The Data Context is also responsible for identifying where to store your validation results. Take quick look at what it can do for you:
The following is an excerpt from the default configuration file (great_expectations.yml) created when you initialize GE. What happens here is: Data Context creates a validation_store under the base directory of uncommitted/validations/ of your great_expectations project.
stores:
validations_store:
    class_name: ValidationsStore
    store_backend:
    class_name: TupleFilesystemStoreBackend
    base_directory: uncommitted/validations/
As you can probably guess, you need to modify this piece of information in the .yml file to let GE know that you are going to store your results in S3. After you have created the bucket and have the prefix at hand, you can make changes to this file as shown here:
stores:
    validations_S3_store:
    class_name: ValidationsStore
    store_backend:
    class_name: TupleS3StoreBackend
    bucket: <your_s3_bucket_name>
    prefix: <your_s3_bucket_folder_name>
Once these configurations are in place, you can run a checkpoint to see the validation results stored in the S3 bucket. Although this process will provide you with the desired outcome, some problems are associated with it. Firstly, with the increase in project size, if you need to store validation results in different S3 buckets (with different permissions for different users). Increasing the length of your YAML file or having an assigned person take care of these configurations is not a pragmatic approach. Secondly, when you provide incorrect bucket names or prefixes, your YAML files won’t validate this until you run your expectations and get an error (this is a trap). We addressed these shortcomings and chose a different path, using Python instead of YAML file to configure the Data Context will make it easy for you to assign different buckets for each validation result. Here is how you can do it:
# Load your Great Expectations suites
for suite in suites:
    data_context = data_context_config(validation_bucket_name=suite.name)
    # Run the validation and other actions
Initialize and Configure Great Expectation DataContext in Python
If you want to achieve the same result without using the YAML file, you must instantiate your DataContext and configure it in code. GE has provided us with documentation on how to do this. So, we are not going to discuss the details of this process. However, we will show you the most important step and which component you need to instantiate a new DataContext.
Make sure to install a recent version of great expectations supporting the DataContext object. This is an excerpt of the code you need to create for your own DataContext.
First we create a function to instantiate a DataContext with given parameters and set parameters in data context configuration:
from great_expectations.data_context.types.base import (
    DataContextConfig,
    DatasourceConfig,
)
def create_data_context(
    validations_bucket_name,
    validations_bucket_prefix,
    data_docs_site_bucket_name,
):
    data_context_config = DataContextConfig(
   datasources={
            "spark_datasource": DatasourceConfig(
                class_name="SparkDFDatasource",
                data_asset_type={
                    "module_name": "sample_dataset",
                    "class_name": "CustomSparkDataSet",
                },
            ),
       },
       stores={
            "validations_S3_store": {
                "class_name": "ValidationsStore",
                "store_backend": {
                    "class_name": "TupleS3StoreBackend",
                    "bucket": validation_bucket_name,
                    "prefix":validation_bucket_prefix,
                },
            },
       validations_store_name="validations_S3_store",
       data_docs_sites={
            "s3_site": {
                "class_name": "SiteBuilder",
                "store_backend": {
                    "class_name": "TupleS3StoreBackend",
                    "bucket": data_docs_site_bucket_name,
                    "base_public_path": "data-docs-website-domain",
                },
                "site_index_builder": {
                    "class_name": "DefaultSiteIndexBuilder",
                    "show_cta_footer": True,
                },
            }
        },
)
In this sample config we have added Spark (spark_datasource) as our data source and configured s3 bucket storage for both validations and data docs. Let’s see how these parameters works.
datasources={
    "spark_datasource": DatasourceConfig(
        class_name="SparkDFDatasource",
        data_asset_type={
            "module_name": "sample_dataset",
            "class_name": "CustomSparkDataSet",
        },
    ),
},
Next we defined our stores, in this case we had a single store named validations_S3_store and we have configured it to store validation results in S3. The stores parameter contains a dictionary, and each key corresponds to a separate store. The value of each key is a dictionary that contains the class name of the store and the store backend(see docs). And then set the validation store to be used in the parameter ‘validations_store_name’
stores={
    "validations_S3_store": {
        "class_name": "ValidationsStore",
        "store_backend": {
            "class_name": "TupleS3StoreBackend",
            "bucket": validation_bucket_name,
            "prefix":validation_bucket_prefix,
        },
    },
},
validations_store_name="validations_S3_store",
If you want to even have more stores, you can add them to the stores dictionary.
stores={
    "validations_S3_store": {
        "class_name": "ValidationsStore",
        "store_backend": {
            "class_name": "TupleS3StoreBackend",
            "bucket": validation_bucket_name,
            "prefix":validation_bucket_prefix,
        },
    },
    "validations_local_store": {
            "class_name": "ValidationsStore",
            "store_backend": {
                "class_name": "TupleFilesystemStoreBackend",
                "base_directory": "uncommitted/validations/"
            },
        },
},
validations_store_name="validations_S3_store", # <- change this to "validations_local_store" to use local storage
The last parameter we need to set is data docs site, for this parameter we set the backend class to be ‘TupleS3StoreBackend’ and define the bucket.
data_docs_sites={
    "s3_site": {
        "class_name": "SiteBuilder",
        "store_backend": {
            "class_name": "TupleS3StoreBackend",
            "bucket": data_docs_site_bucket_name, # bucket name for the data docs site
            "base_public_path": "data-docs-website-domain", # set a domain to view data docs site from
        },
        # the site index builder is responsible for generating an index.html file
        "site_index_builder": {
            "class_name": "DefaultSiteIndexBuilder",
            "show_cta_footer": True,
        },
    }
},
Conclusion
As part of this post, which is an extension of our previous one, we have attempted to make it easy for developers and users of GE to store validation results. In large data-driven projects, there is a need to validate data quality, and this is where GE comes in. But with GE, you can store your results in the project folder or use YAML configurations to store them in a data store (preferably S3). But using YAML configurations comes at the cost of overdependence on human credibility and loss of configure-ability. Herein, we came up with a solution of using the DataContext (GE native) python object to store validation results and configure data docs in a developer-friendly approach. We hope you have enjoyed the post. Please feel free to reach us if you have any questions/or feedback.